Inflatable pipe plugs are specialized sealing devices that temporarily block pipelines during pressure testing to verify system integrity and detect leaks. When properly selected and installed, these tools allow contractors and maintenance teams to isolate specific pipe sections, pressurize them with air or water, and confirm that the pipeline meets required standards before being put into service. This comprehensive guide covers everything from plug types and selection criteria to step-by-step installation, safety protocols, maintenance procedures, and troubleshooting common test failures.
What Are Inflatable Pipe Plugs and How Do They Work?
An inflatable pipe plug is a flexible, bladder-based sealing device designed to expand against the interior wall of a pipe when filled with air or water. The plug creates a temporary, leak-tight barrier that isolates a section of pipeline for pressure testing, flow blocking, or maintenance activities.
The working principle is straightforward: when deflated, the plug is small enough to insert through manholes, test tees, or other access points. Once positioned correctly, an inflation source (hand pump, compressor, or water pump) fills the bladder, causing it to expand radially. The rubber or reinforced fabric outer surface presses firmly against the pipe’s inner diameter, creating a seal that can withstand significant back pressure from the upstream side.
Common applications include:
- Pressure testing newly installed pipelines before commissioning
- Isolating sections for trenchless pipe rehabilitation projects
- Blocking flow during pipeline modification or repair
- Conducting leak detection in gravity sewer systems
- Supporting pipeline stopple operations for line stops
Testing standards such as ASTM F1417 and ASTM C828 govern the use of these plugs in gravity sewer systems and other underground piping networks -1.
Types of Inflatable Pipe Plugs for Pressure Testing
Selecting the correct plug type for your application requires understanding the available configurations. Each design serves specific use cases, pressure ranges, and safety requirements.
| Plug Type | Pressure Rating | Best Application | Key Advantage |
|---|---|---|---|
| Single Bladder | Low to Medium (up to 30 psi) | Routine testing, residential plumbing | Cost-effective, simple design |
| Double Bladder | High (up to 100+ psi) | Industrial, chemical plants, hazardous environments | Fail-safe redundancy |
| Test-Only Plug | Medium | Short-duration pressure tests | No bypass, maximum sealing force |
| Bypass Plug | Low to Medium | Testing while maintaining downstream flow | Allows continuous operation |
| Multi-Size Plug | Low to Medium | Contractors working with varying pipe diameters | One plug fits multiple sizes |
| Single-Size Plug | High | High-pressure testing, critical infrastructure | Firmer seal, higher reliability |
Single bladder plugs are the most common type, featuring one inflatable chamber made from natural rubber or synthetic compounds. These are ideal for routine pressure testing plugs in drain, waste, and vent systems.
Double bladder plugs provide an additional safety layer. If the inner bladder fails, the outer bladder maintains the seal, preventing sudden pressure loss. This design is essential for high-risk environments such as oil, gas, and chemical processing facilities.
Bypass-style plugs include a built-in flow that allows water or air to continue moving through the pipe while the plug remains inflated. This feature is valuable when you need to maintain system operation while testing an isolated branch.
According to industry testing data, pipe plugs for pressure testing should be selected based primarily on the required back pressure rating, not just pipe diameter.
How to Select the Right Pipe Plug for Pressure Testing
Choosing the correct test plugs pressure testing requires evaluating five critical factors. Making an incorrect selection can lead to test failure, equipment damage, or serious injury.
1. Back Pressure Rating
The back pressure rating indicates the maximum differential pressure the plug can withstand from the upstream side. Always verify this rating against your test requirements. Using a plug outside its specified range is the leading cause of catastrophic failures.
Key rule: The plug’s maximum inflation pressure should typically be twice the expected back pressure. For example, if you need to hold 15 psi of back pressure, select a plug rated for at least 30 psi inflation pressure.
2. Pipe Diameter and Sealing Range
Every inflatable pipeline plug has a defined minimum and maximum sealing diameter. Measure the pipe’s inside diameter (ID) accurately before selection. A plug that is too small will not seal; one that is too large cannot be inserted.
For pipes with irregular shapes or corrosion damage, consider a multi-size or sandwich-style plug that conforms better to non-uniform surfaces.
3. Pipe Type and Structure
The pipe material and geometry significantly affect plug performance. Critical considerations include:
- Corrugated pipe: Back pressure rating may be reduced by up to 50 percent
- Elliptical pipe: Similar reduction in pressure rating applies
- Concrete pipe: Rough interior surfaces may cause increased wear
- PVC or HDPE: Smooth surfaces provide excellent sealing but require clean contact areas
4. Material Compatibility
The plug’s construction material must resist the media in your pipeline. Common compounds include:
| Material | Temperature Range | Chemical Resistance | Best For |
|---|---|---|---|
| Natural Rubber | 32°F – 150°F | Poor (water only) | DWV systems, temporary testing |
| Neoprene | -20°F – 200°F | Good (oils, moderate chemicals) | General industrial use |
| EPDM | -40°F – 250°F | Excellent (water, steam, mild acids) | Water systems, high-temperature |
| Nitrile | -20°F – 250°F | Excellent (oils, fuels, hydrocarbons) | Oil and gas applications |
| Viton | 0°F – 400°F | Superior (aggressive chemicals) | Chemical plants, refineries |
5. Access Conditions
Consider the installation environment: pipe depth, access opening size, and whether you need remote deployment. Multi-size plugs offer flexibility when working with varying diameters, while single-size plugs provide a firmer seal for high-pressure tests.
Pro tip from field experience: For manhole insertions, ensure the deflated plug diameter is at least 1 inch smaller than the opening. Forcing an oversized plug through an access point risks damaging the bladder before installation.
Step-by-Step: How to Install Inflatable Pipe Plugs for Pressure Testing
Proper installation directly determines test success and operator safety. Follow these eight steps for every pressure testing operation.
Before You Start: Preparation Checklist
- Clean the pipe interior thoroughly. Remove debris, scale, or sharp objects that could puncture the plug. Even small fragments can compromise pipeline plug integrity.
- Inspect the plug and equipment for visible wear, cuts, or damage. Check that pressure gauges are calibrated and hoses are leak-free.
- Verify the pipe diameter matches the plug’s specified range.
- Confirm back pressure requirements do not exceed the plug’s rating.
Installation Procedure
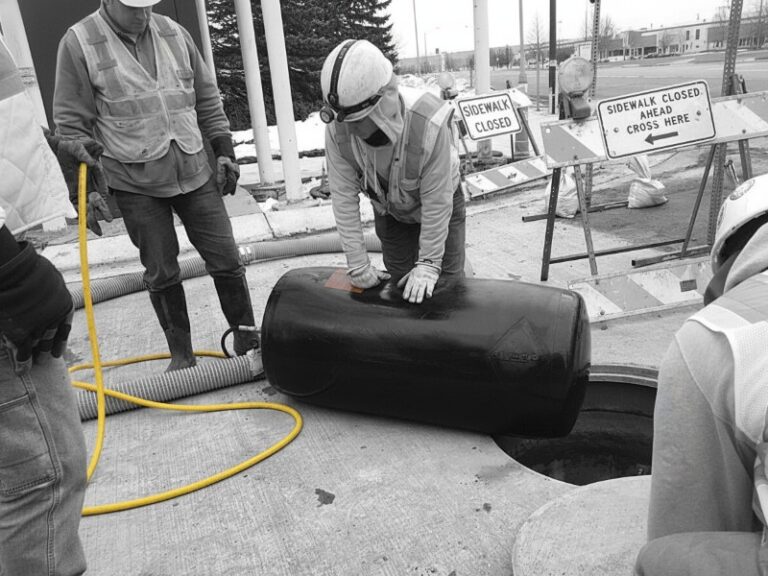
Step 1: Position the plug correctly
Insert the deflated plug fully into the pipe. The plug must be placed at least to the depth of the pipe’s radius. For a 48-inch diameter pipe, this means a minimum insertion of 24 inches from the opening.
Step 2: Ensure proper seating
The plug must have complete surface contact with the pipe walls. Do not position the plug over pipe joints, inlets, or any irregularities that could prevent full sealing contact.
Step 3: Attach inflation equipment
Connect the inflation hose and pressure monitoring gauge. Use sufficiently long hoses to allow operators to stand at a safe distance. Industry standards recommend a minimum of 5 to 10 feet from the manhole opening during inflation.
Step 4: Inflate gradually
Using a hand pump, compressor, or water pump, inflate the plug to the manufacturer’s specified inflation pressure. Never exceed this rating. Monitor the pressure gauge continuously during inflation.
Step 5: Verify the seal
Once inflated, confirm that no air or water escapes past the plug. Listen for hissing sounds or look for bubbles using soapy water on accessible areas.
Step 6: Conduct the pressure test
With the plug securely sealed, pressurize the isolated pipe section to the required test pressure. Hold the pressure for the specified duration (typically 15 minutes to 24 hours, depending on standards).
Step 7: Deflate completely after testing
When testing is complete, slowly release inflation pressure. Do not attempt to remove the plug until it is fully deflated.
Step 8: Remove and inspect
Carefully withdraw the plug from the pipe. Clean it immediately and inspect for any damage before storage.
Critical warning: Never inflate a plug to its full rated pressure when it is outside of a pipe. Without the pipe wall providing counter-pressure, the bladder can burst catastrophically. For pre-use leak testing outside a pipe, inflate to no more than 5% of maximum pressure or 5 PSI, whichever is less.
Safety Protocols When Using Pressure Testing Plugs
Inflatable pipe plugs store significant energy when pressurized. A sudden failure can blast air, debris, and pipe contents out of the access opening with lethal force. Following established safety protocols is non-negotiable.
The Danger Zone
The area directly in front of the manhole or pipe opening during inflation and testing is known as “the danger zone.” All personnel must remain clear of this area. Establish a safety perimeter of at least 15 feet.
Seven Essential Safety Rules
- Never exceed the plug’s rated back pressure. This is the most common cause of catastrophic failure.
- Always tether or block the plug. Secure the plug with a chain, rope, or mechanical restraint rated for the expected thrust force. The force equals back pressure multiplied by the pipe’s cross-sectional area.
- Use calibrated pressure gauges. Uncalibrated or damaged gauges provide false readings that lead to over-inflation.
- Install rupture discs or pressure relief systems. These devices automatically release pressure if the plug becomes over-inflated. Some manufacturers offer field-replaceable rupture discs that allow the plug to reseal and remain reusable after disc replacement.
- Maintain distance during inflation. All operators should stand outside the danger zone, using long inflation hoses.
- Monitor pressure continuously. Do not leave an inflated plug unattended without pressure monitoring and alarm systems.
- Use water instead of air when possible. Water is incompressible, so a rupture releases less stored energy than compressed air. This significantly reduces injury risk.
When to Stop Work
Immediately abort the test and evacuate the area if you observe:
- The plug creeping or moving within the pipe
- Sudden pressure drops on the gauge
- Visible bulging or deformation of the plug
- Unusual sounds (hissing, popping, or rushing air)
Real-world experience: Our testing has shown that most plug failures occur during the first five minutes of pressurization or when operators walk away from the monitoring equipment. Continuous observation throughout the entire test duration is the single most effective safety measure.
Troubleshooting Pressure Test Failures
When a pressure test fails, the source could be either the pipeline plug or the pipeline itself. Systematic troubleshooting identifies the root cause quickly.
Step 1: Determine If the Problem Is the Plug or the Pipe
Signs of plug failure:
- Sudden pressure drop without visible external leakage
- Plug ejected from the pipe (if not properly secured)
- Inflation pressure loss while test pressure holds
Signs of pipe failure:
- Pressure drops gradually and consistently
- Visible water or air escaping from pipe joints, cracks, or fittings
- Test pressure cannot be established at all
Step 2: Inspect the Plug Installation
Before assuming pipe damage, verify:
- The plug is fully seated (not positioned over joints or inlets)
- Inflation pressure matches manufacturer specifications
- The sealing surface is clean and debris-free
- No obstructions are preventing full bladder expansion
Step 3: Conduct Staged Leak Detection
If the plug is properly installed and equipment functions correctly, use staged testing to locate the leak:
Method 1: Move the front plug
Leave the back plug in place. Move the front plug further down the line, testing every 50 feet until you isolate the leaking section.
Method 2: Use short increment testing
Connect front and back plugs with an interconnector hose (typically 20-25 feet long). Test in short increments to pinpoint the exact leak location.
Step 4: Address Common Issues
| Problem | Likely Cause | Solution |
|---|---|---|
| Plug slips during pressurization | Insufficient anchoring | Install mechanical restraint or increase tether strength |
| Pressure drops slowly | Small leak in plug or pipe | Apply soapy water to plug fittings and accessible pipe joints |
| Cannot reach test pressure | Large leak or undersized plug | Verify plug size matches pipe ID; inspect for major pipe damage |
| Plug inflates but does not seal | Wrong size or debris on sealing surface | Clean pipe; verify diameter range |
When to Replace the Plug
Remove a pipe plug from service immediately if inspection reveals:
- Cuts, tears, or punctures through the outer layer
- Swollen, soft, or tacky areas indicating chemical damage
- Hard, cracked, or brittle rubber (age deterioration)
- Bent or corroded hardware (bolts, plates, fittings)
- Leaks around inflation valves or fittings
Industry recommendation: Molded rubber plugs should generally be replaced after three years of service, even without visible damage. Fabric-reinforced plugs have longer service lives but require annual leak testing.
Maintenance and Inspection of Inflatable Pipe Plugs
Proper maintenance extends plug lifespan and ensures reliable performance. Following every use, complete these procedures.
Post-Use Cleaning
Clean the plug immediately after removal using mild soap and warm water. Avoid harsh solvents, acids, or abrasive cleaners that can degrade elastomers. Pay special attention to the sealing surfaces and inflation valve area.
Inspection Procedure
Step 1: Low-pressure leak test
Inflate the cleaned, dry plug to no more than 1 PSIG while it is outside any pipe. Apply soapy water solution to the entire surface, focusing on:
- Seams and molded areas
- Around bolts and metal plates
- Inflation valve and fitting connections
- Any previously repaired areas
If bubbles appear, the plug has a leak and should not be used until repaired.
Step 2: Full-pressure test (recommended annually)
For critical applications or plugs in frequent service, conduct a full-pressure test in a secure, contained environment. Inflate the plug to its rated pressure and monitor for at least 24 hours. Any pressure loss indicates a slow leak requiring repair.
Step 3: Hardware inspection
Check all bolts, nuts, washers, and inflation fittings for:
- Tightness (torque to manufacturer specifications)
- Corrosion or rust
- Stripped threads
- Damage to sealing washers or O-rings
Proper Storage
Storage conditions directly impact plug longevity. Follow these requirements:
- Temperature: Below 110°F (43°C), above freezing
- Environment: Dry, away from direct sunlight, ozone, and UV sources
- Position: Store vertically (suspended) or horizontally on a clean surface
- Avoid: Contact with sharp objects, heavy equipment, or chemicals
- Inflation: Store fully deflated
Service Life Expectations
| Plug Type | Typical Service Life | Replacement Interval |
|---|---|---|
| Natural rubber (molded) | 1-3 years | Annually inspect; replace every 3 years |
| Synthetic rubber (fabric-reinforced) | 5-10+ years | Annually test; replace if damaged |
| Specialty compounds (Viton, EPDM) | 3-7 years | Annual inspection required |
Important note: A plug that fails inspection must be removed from service immediately. Do not attempt field repairs on damaged bladders unless you are a qualified equipment manufacturer or authorized repair center. Contact the original factory for repair or replacement options.
Frequently Asked Questions About Inflatable Pipe Plugs
Q1: What is the difference between inflation pressure and back pressure?
Inflation pressure is the pressure inside the plug that expands it against the pipe wall. Back pressure is the pressure from the pipeline contents (water, air, or other media) pushing against the upstream face of the plug. The inflation pressure must always be higher than the back pressure, typically by a factor of 2:1.
Q2: Can I use the same plug for air tests and water tests?
Yes, most inflatable pipe plugs work with both air and water as inflation media. However, water is significantly safer because it is incompressible. If a water-inflated plug ruptures, the pressure drops instantly with minimal energy release. An air-inflated plug stores energy like a balloon, creating a dangerous explosion hazard upon failure.
Q3: How do I calculate the thrust force on a pipe plug?
Thrust force = Back pressure × Pipe cross-sectional area
Example: A 12-inch pipe (1.13 sq ft area) with 20 psi back pressure generates approximately 3,250 pounds of force pushing the plug downstream. Your anchoring system must restrain this force.
Q4: Can inflatable plugs be used in hot tapping operations?
Yes. Specialized pipeline stopple plugs and PeteStop®-style inflatable plugs are designed for insertion through hot tap fittings. These plugs allow line stopping without system shutdown. However, standard inflatable plugs are not rated for hot tap use. Consult your equipment manufacturer for application-specific products.
Q5: What should I do if a plug gets stuck in the pipe?
Never pull on the inflation hose to remove a stuck plug. First, ensure complete deflation. If the plug remains stuck, try:
- Applying gentle, steady tension while cycling inflation pressure (slight inflate/deflate)
- Using a vacuum generator to ensure full deflation on large plugs
- Flushing with water to lubricate the pipe wall
If these methods fail, contact the plug Material Supplier or manufacturer for guidance.
Q6: Do you offer training for contractors?
Yes. JSW provides comprehensive on-site and remote training programs for contractor teams and municipal crews. Training covers plug selection, proper installation, hazard identification, emergency procedures, and maintenance protocols. Contact our company for scheduling.
About JSW: Your Partner in Pipeline Testing Solutions
JSW is a leading equipment manufacturer and Material Supplier specializing in inflatable pipe plugs, pipeline tapping systems, and pipeline modification tools for the global construction and maintenance industry. With over [X] years of experience serving contractor teams, municipal utilities, and industrial facilities, we deliver engineered solutions that prioritize safety, reliability, and operational efficiency.
Our Advantages
| Capability | JSW Offering |
|---|---|
| Manufacturing | In-house production at our ISO-certified factory |
| Product Range | Pipe plugs for pressure testing, bypass plugs, line stopping systems |
| Custom Solutions | Engineered-to-order plugs for special diameters, pressures, or chemical environments |
| Technical Support | 24/7 engineering support for critical construction and maintenance operations |
| Training | On-site and remote certification programs |
| Global Shipping | Fast delivery to oil, gas, water, and industrial projects worldwide |
Our Services
- Pipeline plug sales and rental programs
- Pipeline tapping and pipeline stopple equipment
- Trenchless pipe rehabilitation support
- Restoration assistance after test completion
- Emergency response for urgent pipeline modification needs
Why Choose JSW?
- Engineering expertise: Our team includes certified pipeline integrity specialists
- Quality assurance: Every plug undergoes factory pressure testing before shipment
- Field-proven reliability: Thousands of successful pressure tests across six continents
- Competitive pricing: Direct from manufacturer pricing, no middlemen
- Warranty: Comprehensive coverage on all manufactured components
Contact JSW today for a consultation. Our engineers will help you select the right inflatable pipe plugs for your specific pressure testing application, provide a competitive quote, and ensure your team has the training and support needed for a safe, successful operation.