
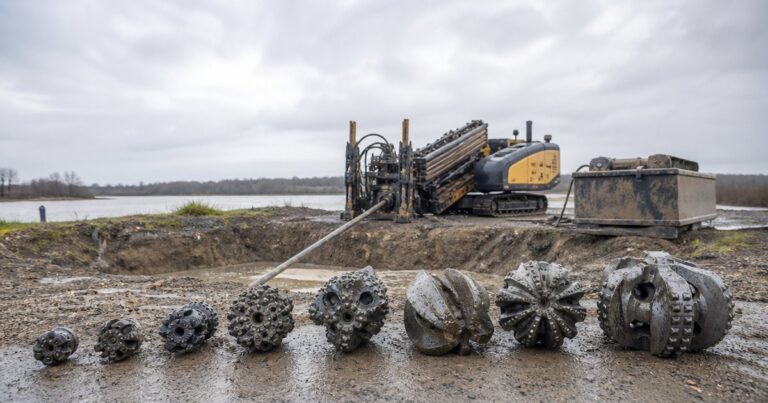
Choosing the right HDD tooling (horizontal directional drilling) in abrasive formations means matching the cutter to the way the ground attacks metal. Manage that wear as a consumable, before it becomes lost torque, stuck tools or a failed bore. Abrasive formations are rarely simply hard rock: loose silica sand, gravel and cobble can wear tooling faster than much stronger rock.
This guide covers what makes ground abrasive, what wears in each phase, how to select cutters and reamers, and how to time replacement on a measurable trend. Scope: this selection and wear logic applies where hard mineral grains – quartz, silica, angular sand, gravel and cobble – are free to move against the tool; in clean, well-cemented rock the cutter decision turns on torque and cutter loading.
The same wear logic applies across trenchless technologies, from short utility bores to long, large-diameter crossings. On crossings we have supported, a clean pull and a stalled job are usually separated by tooling condition rather than rig capacity.
What Makes Ground Abrasive to HDD Tooling?
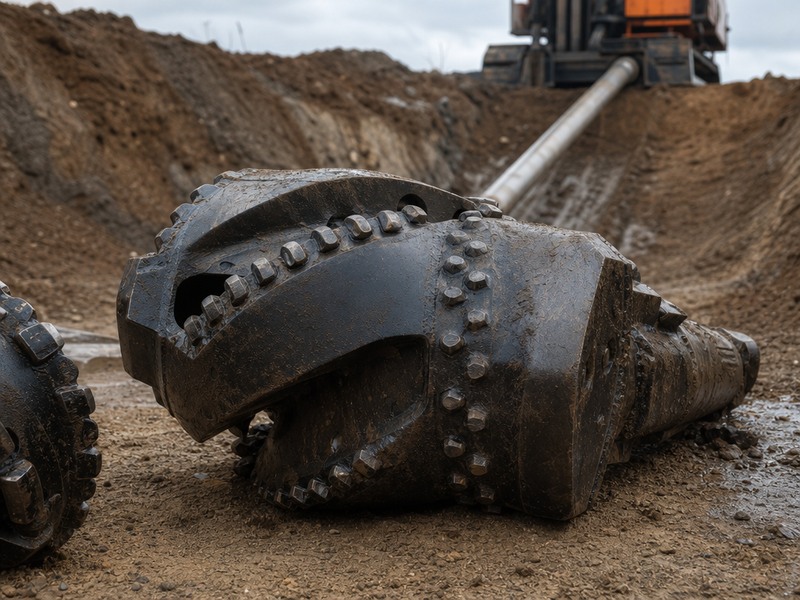
Ground is abrasive when hard mineral grains are free to move against the tool surface. The controlling factors are the amount of quartz and silica present, the size and angularity of those grains, and how weakly they are cemented.
Abrasion is scratch and gouge, so the mineral responsible must be harder than the steel it meets. Quartz sits well above the hardness of hardened tooling steel, which is why quartz-rich sand, gravel and cobble are the classic abrasive formations. Quartz in a weak matrix, such as weathered sandstone, keeps releasing fresh sharp grains, which sustains the wear rate.
- Mineral content: quartz and silica drive wear; clay and carbonate minerals are far less aggressive.
- Grain size and shape: angular, coarse grains cut deeper than rounded fine grains.
- Cementation: loosely bound grains stay exposed; well-cemented rock wears the tool mainly at the face.
- Water and confinement: saturated, confined ground holds grains against the tool.
Why Hardness and Abrasivity Point to Different Tooling
Abrasivity and hardness describe different properties, and confusing them leads to the wrong tooling. Hardness is resistance to indentation and crushing; abrasivity is the ability to scratch and wear a surface. A formation can be abrasive but not especially hard, or hard but not especially abrasive.
Loose quartz sand is abrasive but weak. It offers little resistance to a bit, so penetration stays easy, yet every grain that rolls under the cutter grinds metal from the gauge, the body and the bearings. Competent granite is hard and strong, so it resists penetration and demands high torque, but with the minerals locked in the matrix the cutting faces see less free abrasive action.
- Abrasive and low strength: loose sand, gravel and cobble. Wear dominates; penetration is not the problem.
- Abrasive and high strength: quartzite, abrasive sandstone, some granites. Wear and torque are both high.
- Low abrasivity and high strength: limestone, some shales. Torque and cutter loading dominate; body wear is slower.
- Low abrasivity and low strength: soft clay and silt. The risk is overcutting and bore instability, not wear.
Every tooling choice here is an input to project-specific design and has to be confirmed by a competent engineer for the actual crossing. A single published abrasivity index rarely captures how a particular interval will behave.
The Three Tooling Phases and What Wears in Each
Tooling decisions fall into three phases: the pilot shot, reaming or backreaming, and product pullback. Each phase loads the tooling differently, so the wear mechanism and the inspection focus change.
The pilot shot sets the path the rest of the job follows, because reaming tends to amplify the pilot bore. A deflected pilot is reamed into a deflected hole, so pilot tooling decisions carry through the whole crossing. The pilot string also carries the steering electronics, which makes sonde housing and bent sub condition critical.
Backreaming puts the highest strain on the rig and the tooling. The reamer body, cutters, bearings and connections see the largest loads. Pullback instead transfers load through the pulling eye, swivel and adapters, where the failure mode is a connection or a stretched product pipe rather than cutter wear.
- Pilot shot wear: blade edges and gauge, bit body, hard-facing loss, sonde housing and bent sub scratching, drill pipe hardbanding.
- Reaming wear: cutter inserts and buttons, cutter bearings, reamer body and stabiliser gauge, hardfacing on the body, thread wear.
- Pullback wear: pulling eye and swivel pins, adapter threads, and side loading if the swivel or alignment is wrong.
We have seen crews rebuild a pilot bit more than once on a single abrasive bore and still finish cleanly, because the pilot tooling was sized for the interval rather than the average.
Cutter and Reamer Selection Matrix for Abrasive Ground
Selection starts with ground behaviour, not a single rock strength number. The matrix below matches the common tooling families to conditions and to what each does when the ground turns abrasive.
| Tooling | Best-suited ground | Dominant wear or failure mode | Practical note |
|---|---|---|---|
| Soil / fly cutter | Soft clay, silt, loose sand | Edge and body wear; overcutting if too aggressive | Fast in soft clay, silt and loose sand; use a roller cone or barrel reamer in gravel and cobble |
| Barrel reamer | Mixed soil and soft rock | Body and stabiliser gauge wear | Good hole cleaning; inspect the outer body |
| Fluted reamer | Stable soil and soft, non-abrasive rock | Flute edge wear; packing in sticky clay | Choose flute count for cuttings volume |
| Rock reamer (fixed cutters) | Rock and hard soil, moderate abrasivity | Cutter insert and body gauge wear | Heavy-duty cutters are the minimum for rock |
| Roller cone with tungsten carbide inserts | Hard rock, abrasive formations, cobble, gravel, fractured and mixed ground | Insert chipping; bearing and seal failure; gauge wear | Common choice where abrasion dominates |
| PDC drag cutters (polycrystalline diamond compact) | Moderately hard, non-abrasive rock | Thermal and abrasive damage to the cutting face | Efficient in clean rock; sensitive to abrasives |
| Pilot blade and hard-ground bit | Soft soil blade; hard-ground bit for rock and cobble | Blade and gauge wear; deflection in mixed ground | Match steering to the interval drilled |
| Mud motor | Hard rock and long rock intervals | Motor and bearing wear; bit wear from abrasives | Verify drive and fluid supply first |
As a rule of thumb, roller cone cutters with tungsten carbide inserts suit hard, abrasive and mixed ground, while PDC drag cutters perform in moderately hard, non-abrasive rock. Soil reamers suit clay, sand and loam; rock reamers use heavy-duty cutters. Transitions, cobble bands and fractured zones justify a more conservative cutter.
Wear Protection: Carbide Inserts, Hardfacing, Hardbanding and Sealed Bearings
Wear protection measures such as hardfacing and hardbanding buy life back on every contact surface, not only the cutting face, by putting hard material where the ground does damage.
Robotically applied hardfacing – also described as a wear-resistant overlay – lays a controlled, repeatable hard layer over the body and gauge. Sealed journal bearings are used because once fines reach a bearing the cutter stops rotating and the assembly wears flat.
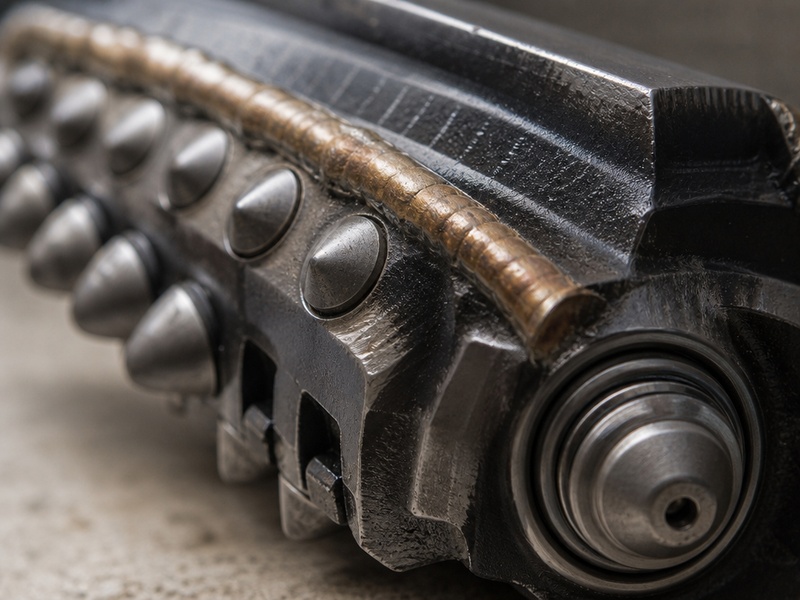
- Tungsten carbide buttons and inserts: protect gauge and cutting faces where grains roll against the tool.
- Robotically applied hardfacing: consistent hard layers on body, blades and gauge.
- Hardbanding on drill pipe: a sacrificial band at the tool joints that takes the rotating wear.
- Sealed journal bearings: keep abrasive fines out of cutter bearings so cutters keep turning.
- Sonde housing and bent sub wear: scratching and gauge loss degrade steering response, so they are wear items too.
How Often Should HDD Tooling Be Pulled for Inspection on an Abrasive Crossing?
An inspection regime only works if it produces a decision, so it needs criteria a fitter can measure and a schedule matched to the wear rate. Abrasive formations justify tighter intervals. Wear limits in the table below come from the tool maker’s drawing and wear limit for each assembly; where the maker gives none, agree a project limit before mobilisation and record it in the crossing file.
| Escenario | What to check | Measurable criterion | Acción |
|---|---|---|---|
| Pre-job | Tooling against the ground model; inserts, hardfacing, bearings, threads | Insert height and gauge measured against the maker’s drawing and wear limit; no cracked inserts | Rebuild or replace; record baseline measurements |
| Per shift | Cutter rotation, insert damage, body and gauge, hardfacing, threads | Gauge within the maker’s drawing and wear limit; cutters rotate freely; no exposed soft steel | Replace worn cutters; re-band pipe |
| Per pass | Buildup versus baseline; weld cracking; seal leakage; pullback hardware | Trend in gauge loss per pass; any cracking rejects the part | Schedule rebuild before the next pass |
| Post-job | Teardown, bearing inspection and remaining-life record | Actual life measured against planned life for the ground | Feed the consumable plan and spares order |
Our field teams record insert height and gauge at the start of every pass. Gauge loss per pass tracks cutter, bearing and body wear together, so that trend – not one reading – drives the decision. The same discipline applies to the completed line, where an independent pipeline inspection service records the as-built condition.
Staged Reaming and Torque Monitoring as the Field Wear Indicator
The final reamed hole is typically about 1.2 to 1.5 × the product pipe outside diameter, reached in stages rather than one pass. Staging keeps each backreaming pass within its cutter and body limits. The 1.2 to 1.5 times outside diameter range follows NASTT good practice for trenchless work and remains a rule of thumb for the crossing.
On an abrasive crossing, torque is the wear indicator a driller feels. Rising torque at steady conditions can mean a dulled cutter, a packed reamer, a hardening path or a hole-cleaning problem. Reaming strains the rig and tooling most, so small changes are worth watching.
- Log torque each pass: compare against the previous pass rather than a single target value.
- Watch the shape, not only the number: a slow drift points to wear; a sudden spike points to obstruction or collapse.
- Tie torque to tooling condition: a rise that clears after tooling is changed confirms wear.
- Set the limit per project: acceptable torque follows from ground, reamer size and fluid, so agree it before the pass and log every pass against the previous one.
Torque spikes, poor cuttings evacuation and fluid inefficiency escalate into stuck tooling or a collapsed bore, and recovery is slow and expensive.
Failure Signatures: Symptom, Likely Cause and Action
Most tooling problems announce themselves before they stop a job. The table maps common symptoms in abrasive formations to their likely cause and the correct field action.
| Symptom | Likely cause | Acción |
|---|---|---|
| Torque rising above the previous pass at steady conditions, with penetration falling, in hard or mixed ground | Under-aggressive tooling for the formation; dulled or worn cutters | Review cutter selection; change or rebuild tooling before continuing |
| Overcutting and bore instability in soft cohesive soil | Over-aggressive reamer; too large a step for the ground | Reduce cutter aggression or step size; review fluid and hole cleaning |
| Accelerated cutter and gauge wear | High quartz or silica content; loss of hardfacing or inserts | Replace worn cutters; restore the hardfacing; confirm protection for the ground |
| Cutters that stop rotating | Abrasive fines in a failed bearing or seal | Pull the assembly; replace bearings and seals; add a spare cutter set |
| Torque spikes with poor cuttings evacuation | Packed reamer; insufficient fluid for the cuttings volume | Clean the reamer; review flow and fluid properties; reduce step size |
| Stuck tooling or a collapsed bore | Escalation from unmanaged wear, loading and hole cleaning | Stop drilling when the string stalls; follow the recovery plan and re-establish circulation before resuming |
| Stretched or damaged product pipe on pullback | Misalignment or a mismatched pullback connection putting side load on the pipe | Check swivel, pulling eye and alignment; verify the load rating against the load |
We have seen two crews on similar ground reach very different outcomes purely through how quickly they acted on these signals.
What Spares Should Be on Site for a Remote Abrasive Crossing?
Abrasive formations consume tooling at a predictable but high rate, so the spares plan is part of the consumable budget. On a remote crossing, a missing cutter set is measured in standby days, not part cost.
- Carry a spare cutter set and reamer body: the two items most likely to end a pass early.
- Stock consumable protection: inserts, hardfacing rods or wire, and hardbanding material for drill pipe.
- Include threads and pullback hardware: spare adapters, pulling eyes and a serviceable swivel.
- Plan the rebuild route: identify the nearest workshop before mobilisation, because turnaround can exceed transport time.
- Record actual life: use each crossing to refine the spare quantities for the next one.
On crossings we have supported, the spares list was set from the abrasivity model and the planned pass count, which is more reliable than copying the last job.
The Economics of Wear Versus Speed
Running worn tooling can look economical because it avoids a trip, but a worn cutter raises torque, slows penetration, demands more fluid and raises the risk on the next pass.
A planned change consumes rig time and a consumable, both predictable. An unplanned failure consumes rig time, a consumable, extra fluid and possibly the product pipe, and it arrives without warning. Replace on the wear trend, not on failure.
Frequently Asked Questions About HDD Tooling in Abrasive Ground
What is the most wear-resistant HDD tooling for abrasive ground?
Roller cone reamers and hole openers fitted with tungsten carbide inserts are the usual starting point for abrasive ground, because the ground has to crush the inserts rather than cut away steel. They suit hard rock, abrasive formations, cobble, gravel, fractured and mixed ground, while PDC drag cutters perform better in moderately hard, non-abrasive rock. Treat this as a selection rule of thumb and confirm the final choice against the actual geology.
How often should HDD tooling be inspected on an abrasive crossing?
Inspect at pre-job, every shift and every pass, with tighter intervals as abrasivity rises. Check insert height, cutter rotation, body and stabiliser gauge, hardfacing and threads each shift, and compare gauge loss against the baseline at the end of each pass. The trend over passes, not a single reading, should drive the decision.
Are roller cone or PDC cutters better in abrasive ground?
Roller cone cutters with tungsten carbide inserts generally suit abrasive ground better than PDC drag cutters. Roller cones suit hard rock, abrasive formations, cobble, gravel and mixed ground, while PDC drag cutters perform in moderately hard, non-abrasive rock. The correct cutter still depends on the interval being drilled.
How do I know when a reamer needs rebuilding?
A reamer needs rebuilding when gauge loss approaches the maker’s wear limit, cutters stop rotating, or hardfacing is worn through to soft steel. These are measurable signs rather than opinions, so record insert height and gauge before each pass and rebuild on the trend, not on failure.
How does drilling fluid affect tooling wear?
Drilling fluid carries cuttings away from the cutters, so poor cleaning lets abrasive grains recirculate and grind the tooling. Insufficient flow or the wrong fluid properties leave grains in the hole and raise torque, which accelerating wear on cutters, bearings and the body. Review fluid and tooling together, not separately.
How large should the final reamed hole be?
The final reamed hole is typically about 1.2 to 1.5 times the product pipe outside diameter. That range, based on NASTT good practice for trenchless work, leaves room for the pipe and cuttings during pullback without making the bore unstable. The value for a specific crossing should be confirmed by the project engineer.
We are reaming 800 m of gravel and cobble – how many cutter changes should we plan and what spares should be on site?
Plan the cutter changes from the abrasivity model and the planned pass count, then carry a spare cutter set and a reamer body. The model sets the expected change interval and the pass count multiplies it: a crossing reamed in four stages applies it four times. Keep the spares that stop the job: cutters, a reamer body and pullback hardware.
Puntos clave
- Abrasivity is not hardness: free quartz and silica grains wear tooling even in loose ground.
- Match the cutter to ground behaviour: roller cones for hard, abrasive and mixed ground, PDC for moderately hard, non-abrasive rock.
- Protect every contact surface using carbide inserts, the applied hard layer and sealed bearings.
- Inspect at pre-job, per shift and per pass, and act on the wear trend, not failure.
- Aim for a final hole about 1.2 to 1.5 times the pipe outside diameter and watch torque as the wear indicator.
How JSW Supports HDD Tooling and Crossing Delivery
JSW executes trenchless crossings with its own crews and equipment. Our scope covers HDD crossing services, servicios de instalación de tuberías y pipeline repair services. Tooling performance follows the same design and quality process as the rest of the works.
We hold tooling selection, wear records and inspection results together, so consumable decisions stay auditable.
- Integrated delivery: crossings, installation, repair and inspection under one engineering and quality process.
- Auditable wear records: inspection and gauge data recorded per pass and filed with the crossing.
- Risk-explicit planning: tooling, fluid and spares planned from the abrasivity model for each interval.
- Own equipment and crews: tooling maintained and rebuilt by the same team that runs it.
Planning an abrasive-ground crossing and unsure which tooling will hold up? Send your ground investigation, bore profile and pipe data for a free review. Our engineers respond with a scoped recommendation and budget range.










 English
  Arabic
  Russian
  Spanish
  French
  Vietnamese
  Polish
  Thai
Thai  Indonesian
  Turkish
  Portuguese